Cacao-Rubbed Steak

The Domestic Man

As the temperatures fall this month, I expect many people to be hesitant about going outside to grill food. Personally, we keep the grill outside and ready all year long, but I realize that not everyone feels that way (especially my Midwestern readers, whose winters are a little more significant than ours). So I thought it would be a good time to work on a solid, foolproof pan-seared steak recipe.

To be honest, we as a family don’t eat steak much, due to its high price point. But it’s an excellent celebratory meal, or for when you’re looking for a simple, developed taste without having to spend much time preparing your meal. Generally, steaks are made from the most tender cuts of the animal and cooked quickly; their tenderness comes from a lack of tough fibers and connective tissue found in the muscles that are more worked. Applying a light…

View original post 494 more words

Best Gluten Free Pie Crust

Gluten Free Gus

GF pie crust ready to roll

With the holidays around the corner, and pumpkin in the larder, it’s pie season. Wait! Maybe it’s always “Pie Season”.

January brrr, cold: frozen “Grasshopper” pie with GF “Oreo” Crust.

February something red: Cherry Pie.

March cloudy with a chance of rain or snow; citrus season in Florida: Meringue Pies.

April Patriot’s Day/Boston Marathon: Boston Cream Pie.

May early times in the garden: Rhubarb Pie.

June strawberries in the markets: Strawberry Pie.

July blueberries ripening in the fields: Blueberry Pie.

August – ditto for the blackberries and raspberries: more fruit pie.

September – stone fruit beginning to ripen: peach and pear pies

October –  pick-your-own orchards are open: Apple Pie.

November –  Thanksgiving: Pumpkin and Mince Pie.

December –  something decadent for the holidays: Chocolate Silk Pie.

This rich, “short” crust is easy and delicious.  The only tricky part is rolling and transferring…

View original post 451 more words

Grain Free Cocoa Cut-Out Cookies

image

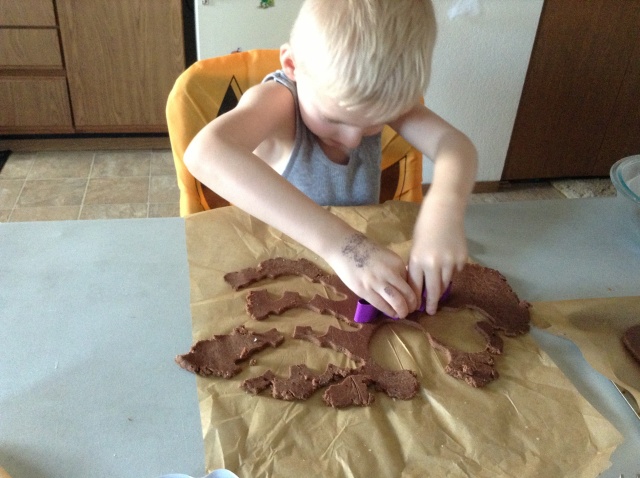
Well friends, it’s getting closer to Halloween and in our house there is tons of excitement over treats, costumes and decorating. My little guy wanted to make some cut-out cookies with some awesome cookie cutters that we found on a clearance last year. I have been wanting to make a chocolate cookie and experiment with dates as a sweetener. These cookies were easy to make and pretty healthy compared to other recipes. Best part of all, they have been officially dubbed “yummy” by the picky preschooler! I hope you give these a try and enjoy them as much as we have. ~Carmen

image

Ingredients:

1 c. coconut flour

1/3 c. baking cocoa

¼ c. coconut oil

¼ c. softened butter

2 tbsp. chia seeds + 6tbsp. water

1 c. medjool dates – pitted + 1 c. HOT water  (this would be about 8 to 10 large dates)

1 tsp. baking powder

1 tsp. vanilla bean paste (extract will do just fine)

¼ tsp. sea salt (I just eyeball it and add 2 pinches)

Prep:

First, soak your chia seeds in warm water for about ten minutes while you are prepping other ingredients, they should be the consistency of a thick gel.  Next, puree your dates and water until smooth.  Then add your coconut oil, butter, vanilla bean paste and soaked chia seeds.  Blend well.

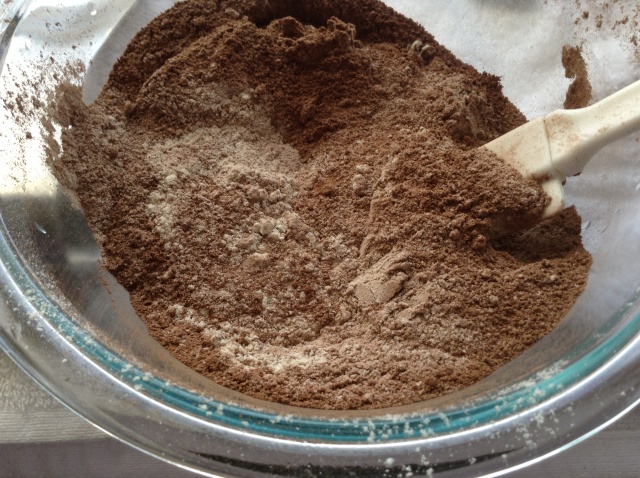
In a separate bowl, sift coconut flour and cocoa to make a fine flour.  Add your baking powder and salt.  Mix well.

image

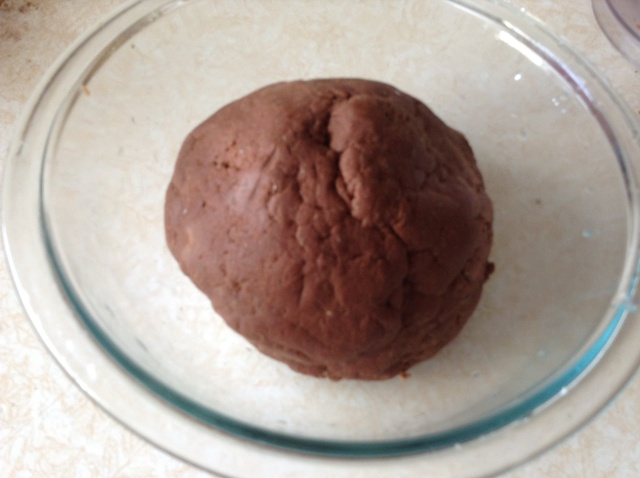
Now blend your dry ingredients with the wet mixture.  You can do this by hand but a food processor or stand mixer will make work a bit shorter.  The dough is going to look like brown Play-Doh, this is good.  Now, roll the dough into a ball and refrigerate it for at least an hour.  I like to cheat and throw it in the freezer for 20 minutes but I’m incredibly inpatient.

image

Once your dough is chilled, pre-heat your oven to 350, and place the dough ball between two sheets of parchment paper lightly greased with coconut oil.  Roll the dough to 1/8-1/4” depending on how thin or crispy you want them.  I recommend going thicker if you will be adding the glaze.  Use your cookie cutters to cut out shapes, or if you want a square graham-cracker style cookie just cut it with a knife (these are great with coffee or used for s’mores).

image

Bake for about 10-12 minutes.  NOTE!  All ovens are not created equal!  I highly recommend checking how fast these are baking at the 5 minute mark and adjust accordingly.  If you want soft cookies, take them out early and let them sit on the hot pan.  It’s sort of a trial and error sort of deal.

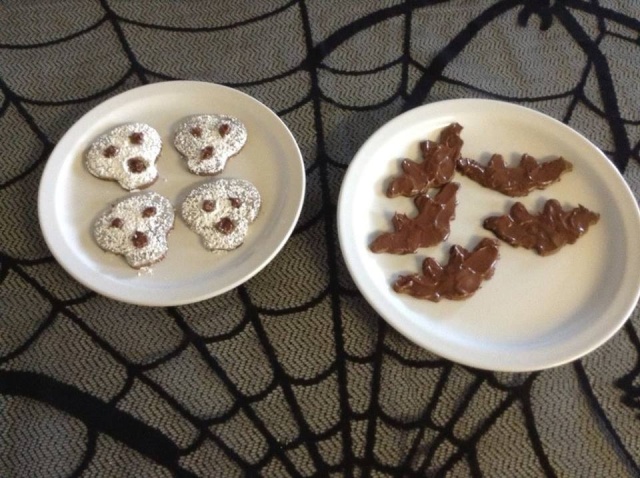
Allow the cookies to cool completely before frosting them with your favorite glaze or frosting. I used melted milk chocolate on the bats and powdered sugar on the skulls.

This post is part of the following blog link-ups:  Party Wave Wednesday, Real Food Wednesday, and as always if you like these posts feel free to like my Facebook page!

Getting The Most From Your Real Food Investment – Chicken


photo(7)photo(6)photo(5)photo(4)IMG_20130927_103124


When you make a significant investment in nourishing, real foods it is important to get the most our of your investment.  Here are just a few ways I get the most bang for my poultry dollars!

Buy whole chickens.  You can do so much with a whole chicken!  Here are a few ways I utilize mine:

1)  Meal 1: Roasted chicken breast, sauteed vegis over rice

2) Meal 2: Chicken Fajitas in corn tortillas

3) Leftovers:  Stew the entire carcass for 10 hours in the slow cooker.  Strain the broth and freeze the leftover stewed carcass!

4) Use fresh chicken broth to make a creamy soup: 2 cups broth, 1 cup heavy cream, 1 tbsp curry, 1/4 cup chives ( Add any leftover meat).

5) Use previously stewed/frozen carcass to make a remouillage. Cooked longer (24 hours) it can be just as tasty as the first batch!

So here, we have 5 different uses for one bird at the same price as a package of pre-cut chicken breasts.  How do you stretch your food budget? ~Carmen


Pumpkin Muffins with Maple Buttercream

1275844_544680435602585_1719051208_oThis post has been long overdue.  I have been obsessing over perfecting a recipe for low-carb, grain-free pizza crust and now that I think I’ve got it I can focus on getting my posts up!  These pumpkin muffins were inspired by the all things pumpkin across the interwebs as of late.  They are moist and very reminiscent of pie, they even got the picky hubby seal of approval.  These puppies are grain free, and taste perfectly fine without the (delicious) maple buttercream.  Let me know what you think! ~Carmen

Pumpkin Muffins

1 cup coconut flour

1 cup canned pumpkin

4 large eggs

3 tbsp butter

1/4 tsp. sea salt

1/2 tsp. baking soda

1 tbsp. vanilla

1 tsp. pumpkin pie spice

Prep:

Line your muffin tin,  you don’t absolutely need tin liners but it makes for easy clean-up muffin removal.  Preheat your oven to 350.

Put everything into a food processor and blend until smooth.  This batter should be the consistency of a thick cake mix.  If you don’t have a food processor, a mixer and a bowl will do just fine, just be sure to incorporate your coconut flour, flax and baking soda before mixing into the wet ingredients.

Bake for approximately 50 minutes.  Your oven may be hotter or cooler so the time can vary.  The muffins are done when a toothpick comes out clean, but be sure not to overcook.  The best thing to do is remove the pan from the oven and let the muffins cool in-pan to be sure that the centers are cooked.

Maple Buttercream

1 stick of butter

1 cup confectioners sugar

4 tbsp. maple syrup

Add all to your food processor or a bowl and mix until fluffy.  If you want a thicker frosting you may want to tinker with the confectioners sugar a bit.

This post can be found on the following blog carnivals: Party Wave Wednesday, Real Food Wednesday,    If you like my posts feel free to show the like love on my Facebook page!

Creamy Pumpkin Puree

What a fantastic idea from Gluten Free Gus!

Gluten Free Gus

IMG_5817

This is one of the easiest and most satisfying preparations for fall pumpkins, or butternut or acorn squash. It’s richness satisfies any urge for mashed potatoes or risotto. A little heavy cream is what makes it seductive, but alternately one can use hearty chicken broth, milk, or dairy substitute.  Roasting the pumpkin in the oven until the flesh is soft and slightly caramelized adds wonderful dimension to the flavor profile. Our how-to photos show butternut squash. The garden, farm stand, or local market is your culinary palette.

Creamy Pumpkin Puree – Serves 4

Click Here for Printable Recipe

INGREDIENTS:

2 cups roasted pumpkin or squash

1/4 cup heavy cream (vegan: scant 1/4 cup almond milk plus 2 teaspoons coconut or olive oil)

1/4 teaspoon sea salt

optional: pinch of grated nutmeg

Top with a drizzle of honey or Pumpkin Pesto

DIRECTIONS:

1. Combine the pumpkin, cream, and salt in a…

View original post 25 more words

Pepitas Pesto

Gluten Free Gus

Pepitas Pesto

“What did the butcher say to the customer on Halloween?” (See below.)

It’s been almost a year since we began writing it down for Gus and anyone else interested our gluten-free path and recipes. The first post was a shot from the hip, a beloved recipe I’d sent Gus in response to his request for something he could make for his “Farm to Table” seminar using squash harvested from the on-campus organic garden. The jack-o-lantern Nick carved the day before illustrated it. Because it’s October we’re again thinking pumpkins.

Pumpkin Seed Pesto aka “Pepitas Pesto”

Click Here For Printable Recipe

INGREDIENTS:

1 cup (4oz.) toasted pepitas/shelled pumpkin seeds

1 clove garlic, finely minced

1/4 cup fresh cilantro leaves

1 teaspoon fresh ground pepper

1/4 teaspoon salt

1/4 teaspoon ground cumin

2 tablespoons grated Parmesan or Robusto cheese

1/4 – 1/2 cup extra virgin olive oil

DIRECTIONS:

1.  Combine 3/4 cup…

View original post 105 more words

Cilantro & Lime Rice

photo(9)

Today I’m sharing by mom’s secret to adding some zest to plain white rice.  Cilantro and lime go so well together and rice picks up the flavor nicely.  This is a great side for a Mexican cuisine and balances out the heavy tomato flavors of recipes for enchiladas and fajitas.  It doesn’t take any more time, and can turn a very basic staple into a pot-luck worthy dish.  On a side note, save those lime rinds to make citrus infused vinegar for a non-toxic household cleaner.  I hope you enjoy this dish as much as my family does!

Ingredients:

Rice – 4 cup cooked yield (I use Organic Basmati)

2 limes

Cilantro – a nice handful is fine

Sea Salt

photo(10)

Prep:  Prepare your rice according to the directions, using sea salt rather than regular table salt really brings out the flavor of the dish.  Roll your limes firmly with the palm of your hand to get the juices going then slice into quarters.  Finely chop a handful (roughly a  ¼ cup) of cilantro.   Toss the limes and cilantro into the rice, after it is mixed well you will want to remove the limes (if they are left in too long, the rice can take on the bitter flavor of the rind).  Serve immediately.

If you like my recipes, please share them with your friends and follow me on Facebook! This post can be found on the following blog carnivals: Party Wave Wednesday, Real Food Wednesday,

Savory Stuffed Peppers

IMG_1205

These yummy stuffed peppers are a great way to add some variety to your meal plan without a bunch of extra work.  I love these because you can literally throw everything into the food processor, stuff the peppers, toss ‘em into a crock pot and forget them until dinner time.  The recipe that I made utilizes a pound of ground beef, and there is plenty to stuff 6 or 7 peppers.  My crock holds 5, and for a family of three that gives us dinner and a left over lunch for the hubby.  I did have some extra meat mixture left over; stay tuned to see what I did with that. I hope you enjoy this simple, flavorful recipe.  Feel free to make it your own and share how it turns out.  ~Carmen

Tools:

Food Processor or large bowl and knife for chopping

Ingredients:

½ cup basmati rice

6 oz. tomato paste

1 lb. ground beef

2 tsp. chili pepper

1 tsp. maple syrup

3 garlic cloves

¼ large white onions

1 egg

5 – 7 red peppers

1 tsp. sea salt

**All of these ingredients are uncooked, the rice will cook in the meat juices**

photo(14)

Prep:

If you are using a food processor, toss the garlic cloves and onion in first to chop finely.  Next add your egg, tomato paste, maple syrup.  Lastly you mix in your ground beef and rice. If you are using a bowl and knife, finely chop your garlic and onion, whisk your egg and add it to the mixture.  Stir in tomato paste and maple syrup then add your rice and ground beef.  This step works well with your hands.

Once your mixture is prepared, cut the tops off of your peppers making sure that you cut off as little as possible.  I like to pull off the stems and keep the tops for “lids”, it just makes the dish look prettier I think.  Now you can stuff your peppers about ¾ full.  Leaving room at the top is important so that the rice can expand.

photo(18)

Add your peppers to the crock pot along with a few tablespoons of water or beef bone broth if you have some on hand.  This will keep the peppers from sticking to your crock.  Set your crockpot on low if you want it to cook slower in about 7 hours or on high for 4 hours.  This dish is great with a side of sliced pineapple.

This post is linked to the following blog carnivals: Party Wave Wednesday, Real Food Wednesday,

Easy, Non-toxic Way To Scrub Pots & Pans

photo(6)

Cooking real foods can sometimes result in real messes, especially where your pots and pans are concerned.  Here is a tip to get those stainless steel pans sparkly clean without harsh chemicals and cleaners.

You Need:

Dishcloth

Baking Soda

Castile Soap

Method:

Add a few teaspoons of baking soda directly to you pan along with a few drops of the castile soap.  Spread the mixture in the pan and let it sit for a few minutes.

photo(5)

If you have lots of stuck on grime, you can leave this in your sink overnight.  Scrub the mixture in a circular motion then rinse with water.

photo(4)

It’s that simple!  ~Carmen

photo(7)